
CEO
Set up WhatsApp reminders in Happoin: A 3 Minute Guide to Automate Your Schedule Today
To set up WhatsApp reminders in Happoin, simply navigate to Menu > Integrations > Add > WhatsApp QR Session and link your business or personal number to start sending automatic notifications. This process eliminates "WhatsApp Slavery," allowing you to recover hours of your day by moving away from manual, one-by-one appointment confirmations.
As a professional, your time is your business's most valuable asset. Spending your afternoon sending messages like "Hi, are you attending tomorrow?" is not only tedious but an administrative burden that keeps you from focusing on what really matters: serving your clients or ensuring that no "empty chairs" affect your daily revenue.
The Power of Using Your Own Number: Trust and Familiarity
One of the competitive advantages of Happoin is the option to "Integrate your own WhatsApp." Unlike other systems that send messages from generic numbers unknown to your clients, Happoin allows the client to receive the notification from your actual business number. This makes it 4 times more likely that a client will check the message compared to receiving it from an unknown number.
This is crucial for building immediate trust. When a client of a clinic, barbershop, or beauty salon receives a message from a familiar number, the open and response rate is close to 100%. Furthermore, we leverage the tool's familiarity: your clients don't have to download new apps or register in complex portals. Everything happens within the WhatsApp chat they already use daily.
Linking your own number means that if the client has an additional question, the response will arrive directly to your WhatsApp. This allows you to maintain contact or let our AI bot, HappiBot, handle their inquiries, giving you back the freedom to manage your time as you wish.
Step-by-Step Tutorial: Your Automated Agenda in 4 Steps
Setting up this integration is a process designed to be executed even if you have no technical knowledge. This Happoin WhatsApp setup guide will help you activate your system today:
Step 1: Accessing Settings
Once inside your Happoin dashboard, go to the Menu. Select Integrations and then WhatsApp QR Session.
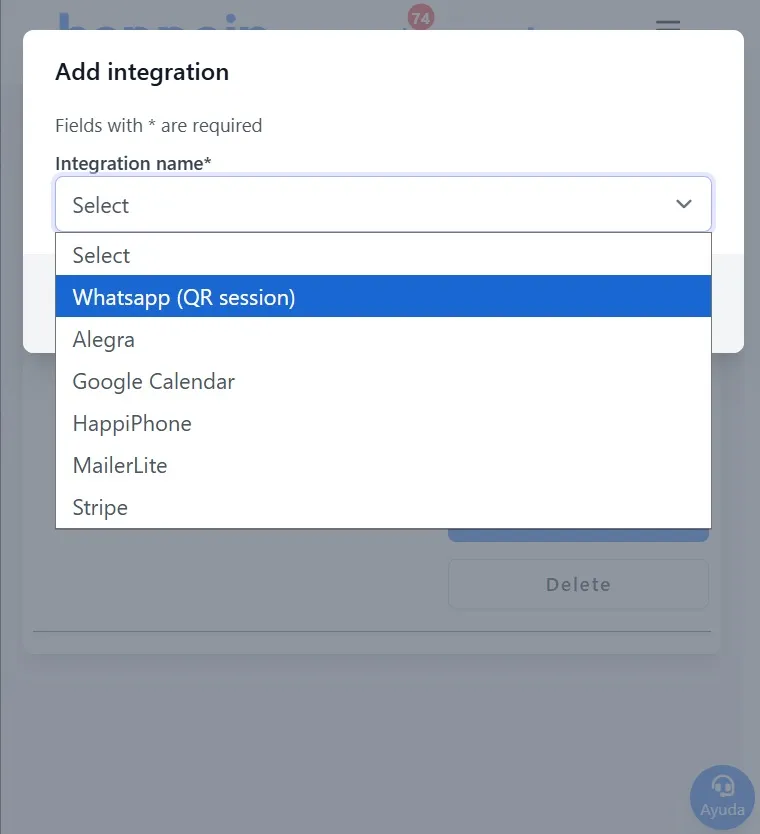
Step 2: Quick Linking via Phone Number
While you can scan a QR code (like WhatsApp Web), we recommend the phone number linking method if you are accessing from your mobile device. If you are on a computer, you can also use the "Scan QR Code" option.
-
Select "Integrate my WhatsApp" and click "Continue."
-
Choose one of the official linking methods: By phone number (ideal for mobile) or Scan QR (ideal for desktop) and follow the indicated steps.
Once you have successfully linked your account, you can proceed to customize how your appointment notifications and reminders are sent.
Step 3: Personalization with a Human Touch
In the Personalize tab, you can draft the messages your clients will receive and set the delivery window for notifications. The most important part of learning how to automate appointment reminders on WhatsApp effectively is using dynamic variables like {client_name}, {date}, and {time}.
For example: "Hi {client_name}, we are reminding you of your physiotherapy session for {date} at {time}." This ensures every message feels personal and professional, avoiding a robotic or cold communication style.
In the Sending Hours option, you must set the time range for sending WhatsApp notifications. No notifications will be sent outside of that range. We recommend a wide range, such as 7 am to 9 pm, to ensure your clients receive messages at appropriate times.
Step 4: The Magic Link (Detail URL)
It is fundamental to always include the {url} variable (Appointment Detail URL). This link allows the client to see all their appointment information and, most importantly, confirm or cancel with a single click. By facilitating the action, you drastically reduce friction and forgetfulness.
Notification Types Available for Your Workflow
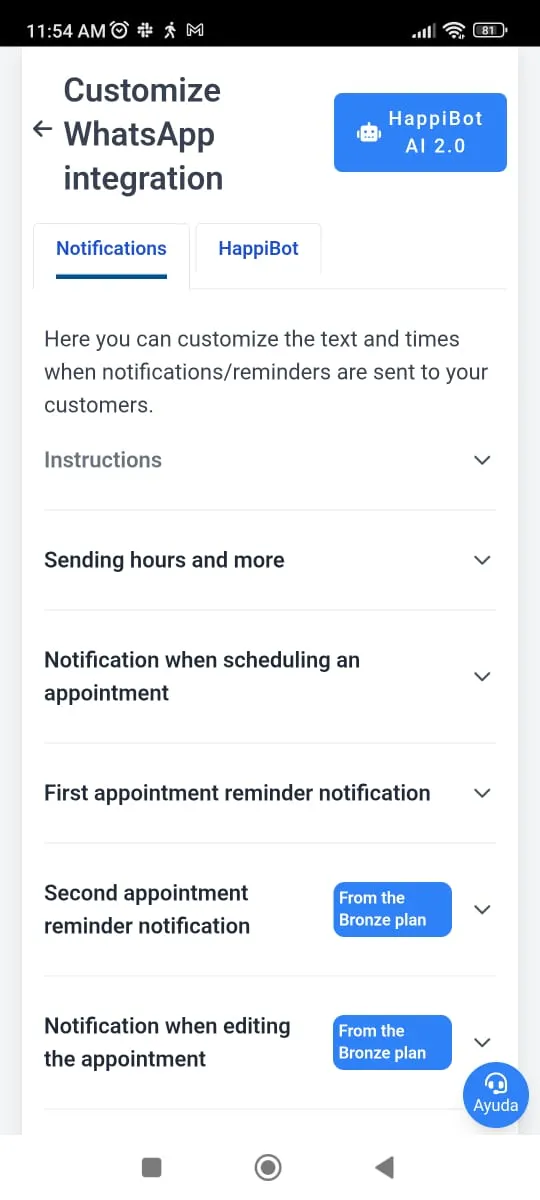
Happoin doesn’t just send a reminder; it manages the entire appointment lifecycle. In the Personalize option, you can activate and edit the following message types. We recommend keeping the variables inside the brackets { } to personalize each message:
-
Appointment Scheduled: The first message sent once you schedule the appointment or the client books through your link.
-
Example: Hello {client_name} 👋🏻 your appointment was scheduled for {date} {time} with [Business Name] 📅 Please Confirm, Reschedule, or Cancel here: {url}
-
-
First and Second Reminders: Configure these to be sent with the lead time you prefer (e.g., 24 hours and 2 hours before). Vital for combating no-shows.
-
Example: Hello {client_name}, we remind you of the appointment for {date} {time} with [Business Name] 📅 Please Confirm, Reschedule, or Cancel here: {url}
-
-
Edit Appointment: If you change the time or date, the system automatically notifies the client with the new data.
-
Example: Sorry {client_name} 👋🏻 your appointment was modified for {date} {time} with [Business Name]. Please Confirm, Reschedule, or Cancel here: {url}
-
-
Appointment Cancelled: Politely notifies the client that the slot has been released.
-
Example: Sorry {client_name} 👋🏻 your appointment with [Business Name] for {date} {time} was cancelled.
-
-
One Day After: Perfect for sending a satisfaction survey or thanking the client for their visit.
-
Example: Hello {client_name} 👋🏻 [Business Name] wants to know your opinion of the appointment. You can send it here: {url}
-
-
Automatic Cancellation: For strict policies. If the client doesn't confirm X hours before, the system cancels the appointment automatically to free your agenda.
-
Example: {client_name}, since you have not confirmed the appointment for {date} at {time}, it has been cancelled.
-
Real Results: Fewer Empty Chairs, More Revenue
Automation is more than a convenience; it is a revenue recovery strategy. Professionals using Happoin manage to reduce absenteeism by up to 30% starting from the first week of use. Avoiding just one empty chair a day pays for the monthly subscription itself.
Finish Your Setup Now
Don't let manual tasks continue to steal time from your personal life. If you are in your trial period, now is the time to see the real impact.
Finish WhatsApp Configuration Now
Or, Choose a Plan Now to ensure your reminders never stop. We also recommend our guide on Customer Self-Scheduling to further optimize your time.
FAQ: Frequently Asked Questions
-
Can I use my own WhatsApp number? Yes, linking your business number through "WhatsApp QR Session" is essential for building a "trust ecosystem," increasing confirmation rates significantly.
-
Do my clients need to download an app? No. The entire process happens directly through WhatsApp or the provided URL link.
-
How do I avoid sounding like a robot? Use dynamic variables like
{client_name}and emojis to maintain a human touch and align the messages with your brand’s tone. -
Is the technical setup difficult? No, linking takes less than 3 minutes and requires no PC or programming knowledge. It is a "quick implementation" solution for busy professionals.
-
Can I choose the delivery schedule? Yes, you define the time range (e.g., 8 am to 8 pm) and how many hours in advance each reminder is sent.